 Anyone who is curious about the internals of their Sony Ericsson Xperia X10 will probably be glad to check out this teardown guide. Disassembling the Xperia X10 is a tricky process, but thankfully McKebapp from xda-developers has gone through the hard work detailing the step-by-step process in taking your handset apart.
He has kindly allowed us to reproduce the guide here in full, bringing this information to the wider X10 community. If you are thinking about taking your phone apart, please read the instructions carefully and if you get stuck don’t force anything. Check out the full guide after the break.
Xperia X10 Disassembly Guide
[The Xperia X10 Blog absolves itself from any responsibility should you decide to carry on and you break your handset. Please proceed with caution and at your own risk.]
Step 1: Requirements
Torx 6 Screwdriver
Small straight-slot screwdriver
Credit card or guitar pick
Toothpick
Small knife
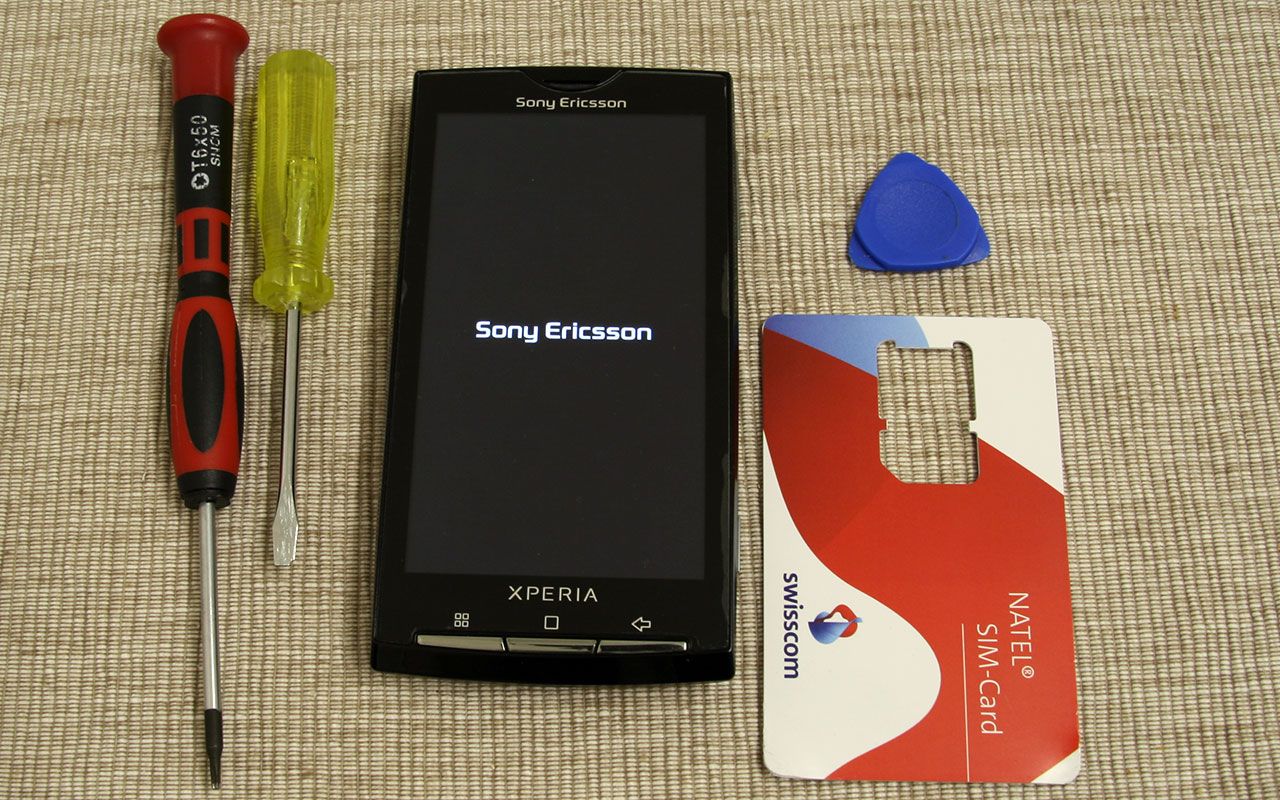
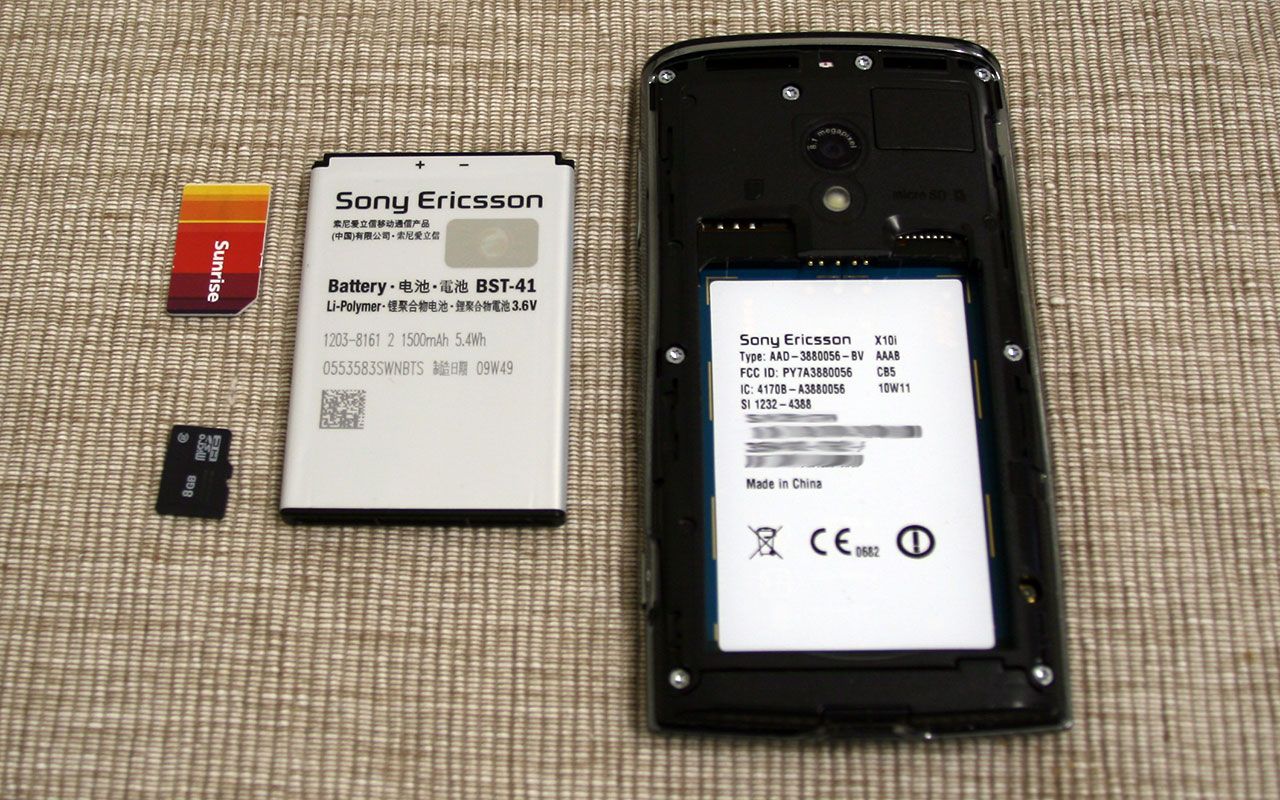
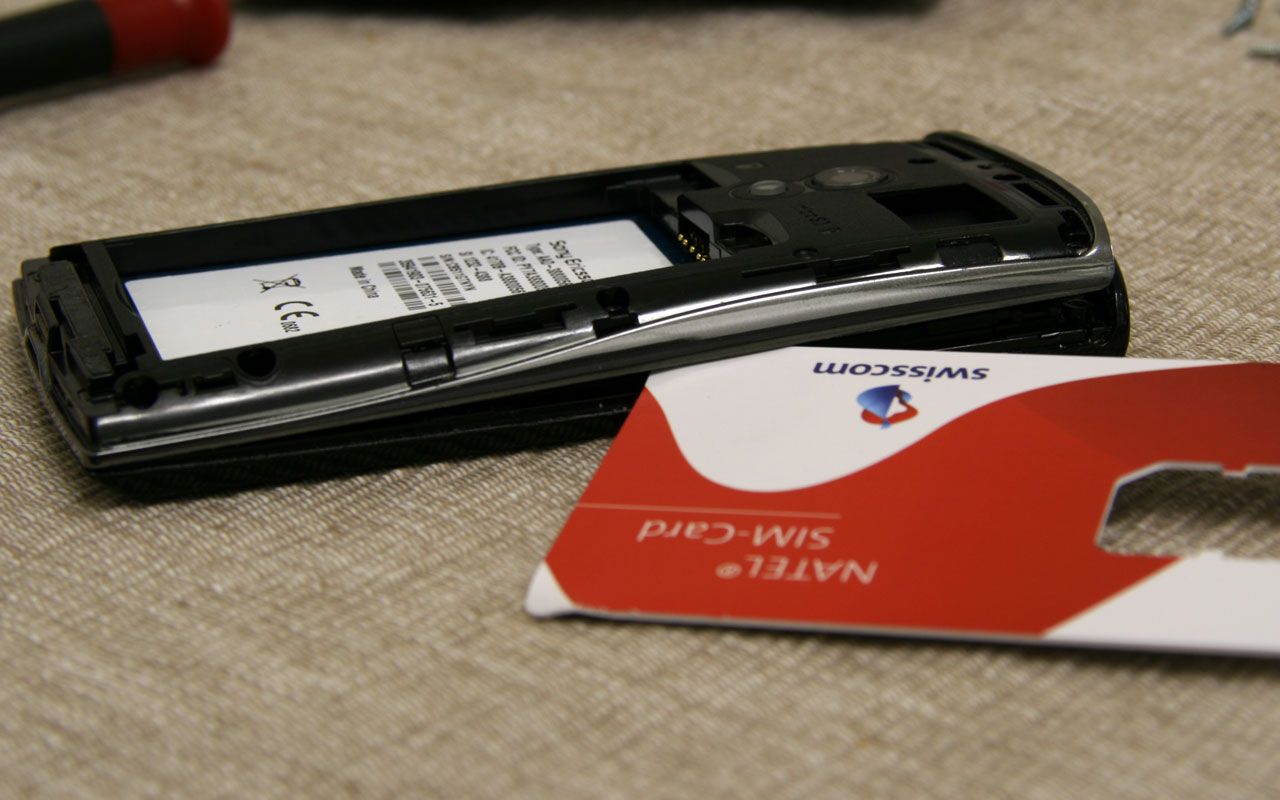
Step 2: Remove peripheral components
Remove all of the loose parts like the battery, sim card and memory card.
Step 3: Unscrewing
Take out the 8 screws from the handset, keep them in a safe place to avoid loosing any of them.
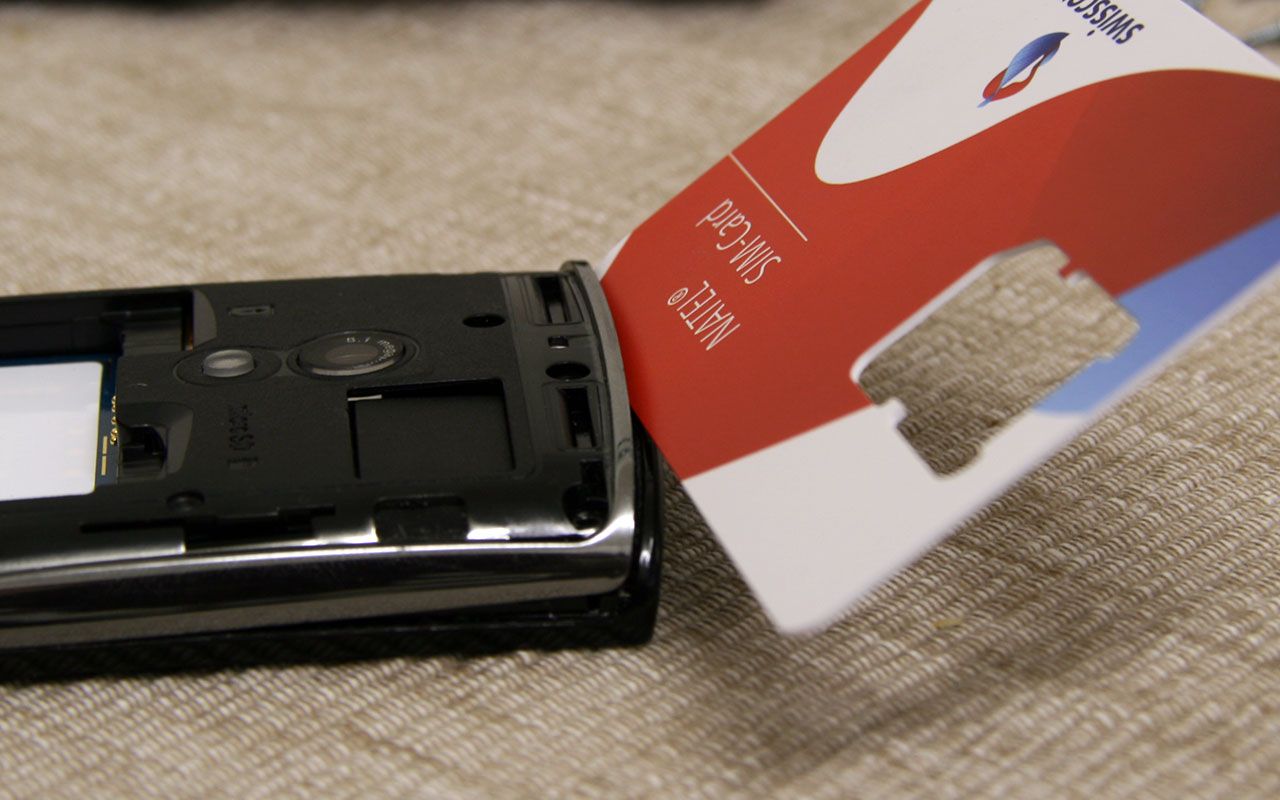
Step 4: Remove lower support
Remove the lower part of the phone that has small connectors to the PCB and is half-glued to the back cover. Use a small knife to pierce once under both sides of the handset. You should now be able to lift it open with your own finger nails.
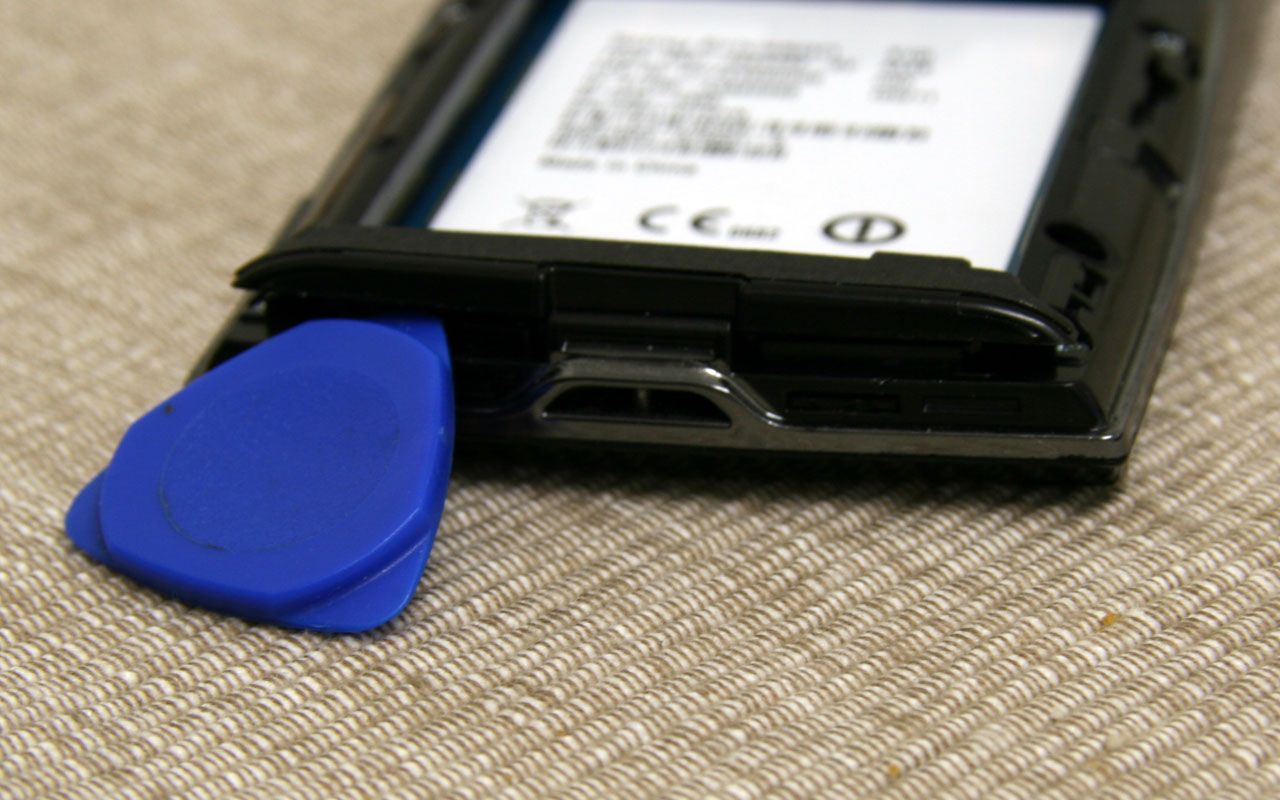
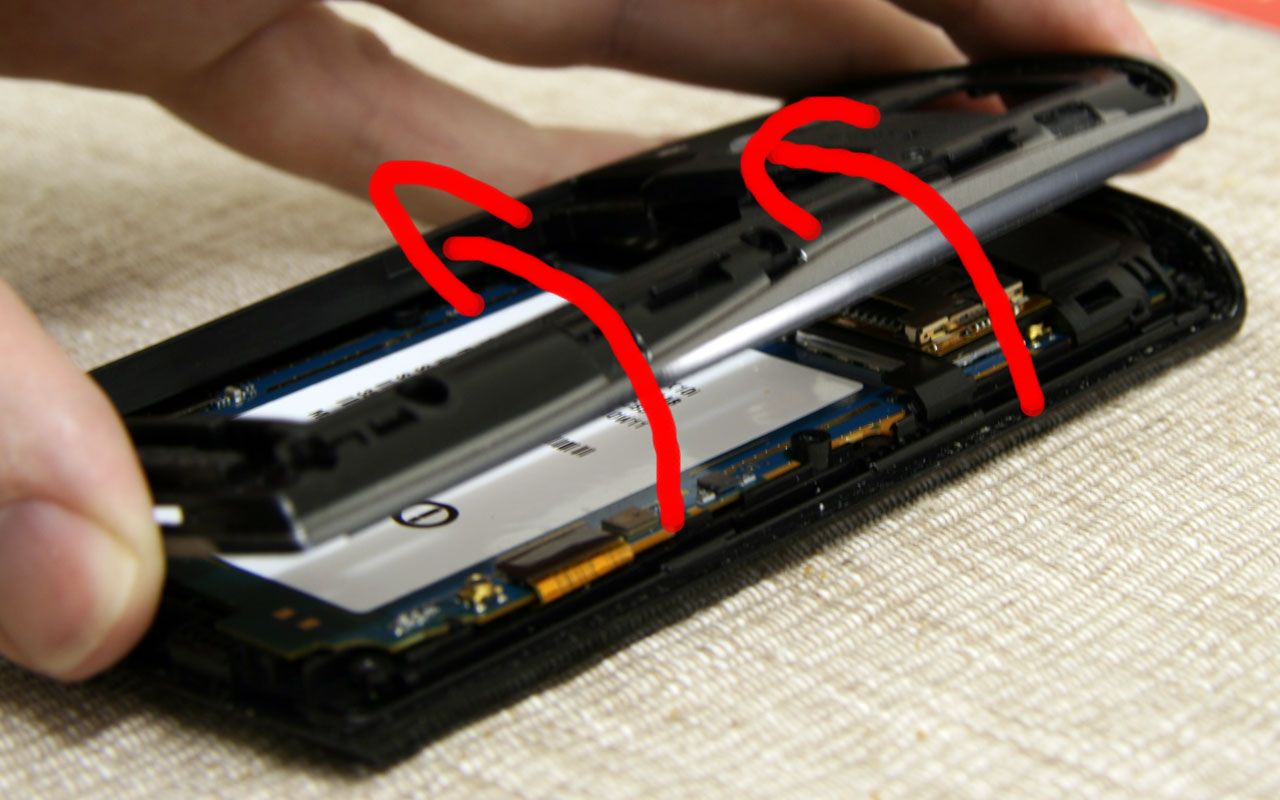
Step 5: Create a gap between covers
Starting at the top, use a guitar pick to create a small gap between the back and front covers. Be patient and don’t use a knife otherwise the faux-chrome will start to peel off. Once the gap is big enough use a credit card (that is slightly thicker than the guitar pick) to force the upper end of the back cover off its clips. The smooth plastic should prevent the handset getting scratched.
Step 6: Create gap on right side
Continue creating the gap on the right side. Start slowly from the front cover and stick the credit card between the housing parts. The first clip should now be open but continue until you are on the lower right side. Be careful not to pierce too deep with the credit card, otherwise there is a chance of cutting the ribbons beneath. Now release the lower clips as you did for those at the top of the housing.
Step 7: Loosen left side
At this point, the right side and bottom should be loosened. The clips on the left side are too tight to get a credit card through. However, this is not needed, if you lift the back cover slowly and wiggle it a little it should come off by itself. Note that this step may require a bit of force to open properly.
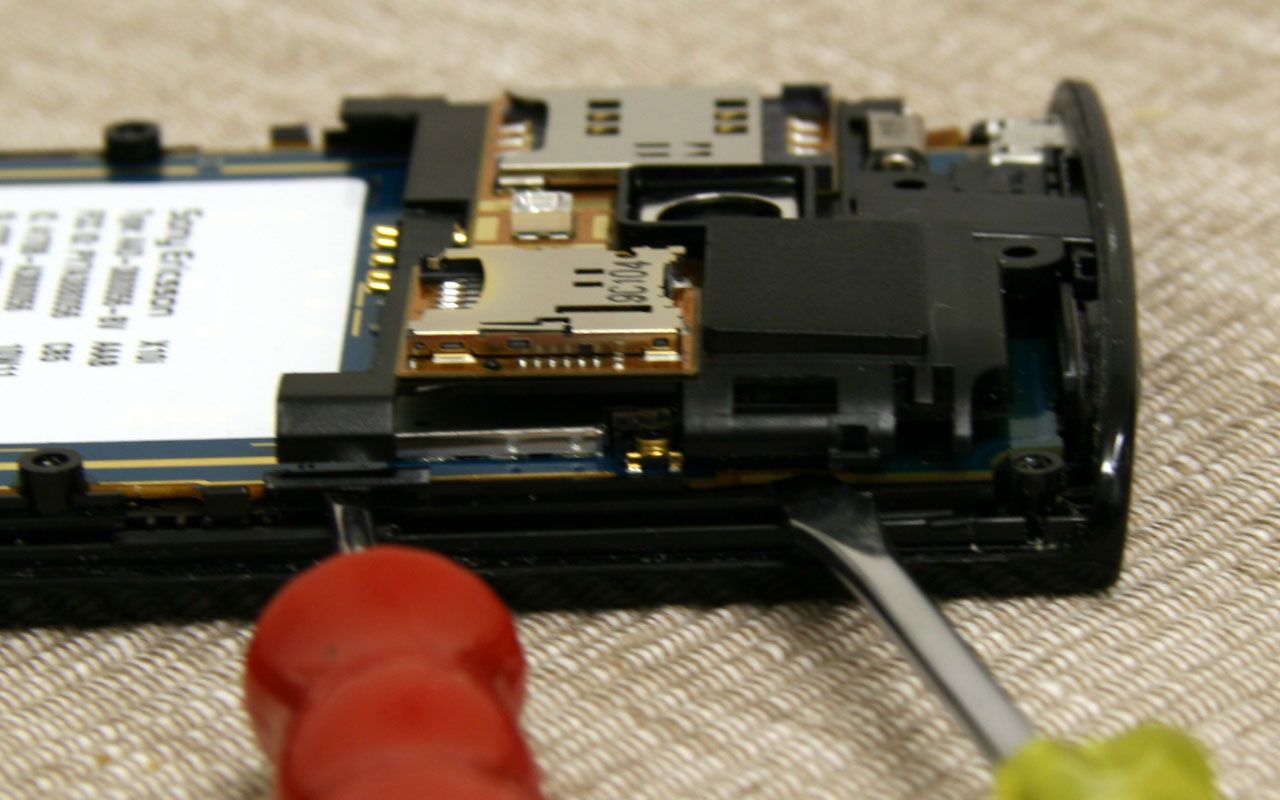
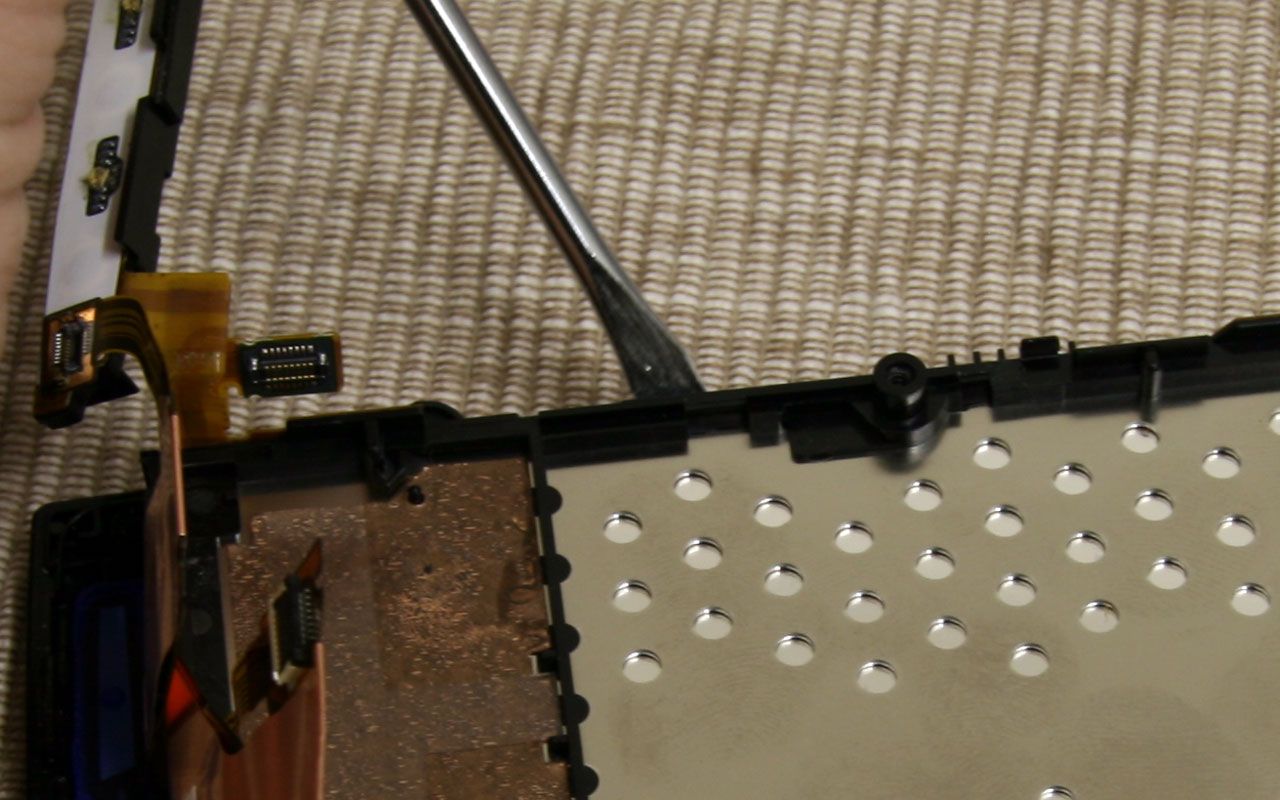
Step 8: Prepare to remove sim and memory card holder
Now you need to remove the sim and memory card holder that has four clips. Two of these clips can be seen in the picture below (where the screwdriver is pointing to). Use a toothpick to lever between the PCB and clip from underneath. Now do the same to the two clips on the other side. DO NOT REMOVE THE HOLDER YET. Take a closer look at the next picture first.
Step 9: Remove holder
A ribbon sits underneath the holder so you have to be careful not to rip it. Lift the holder a little from the right side and use a toothpick to lift it off.
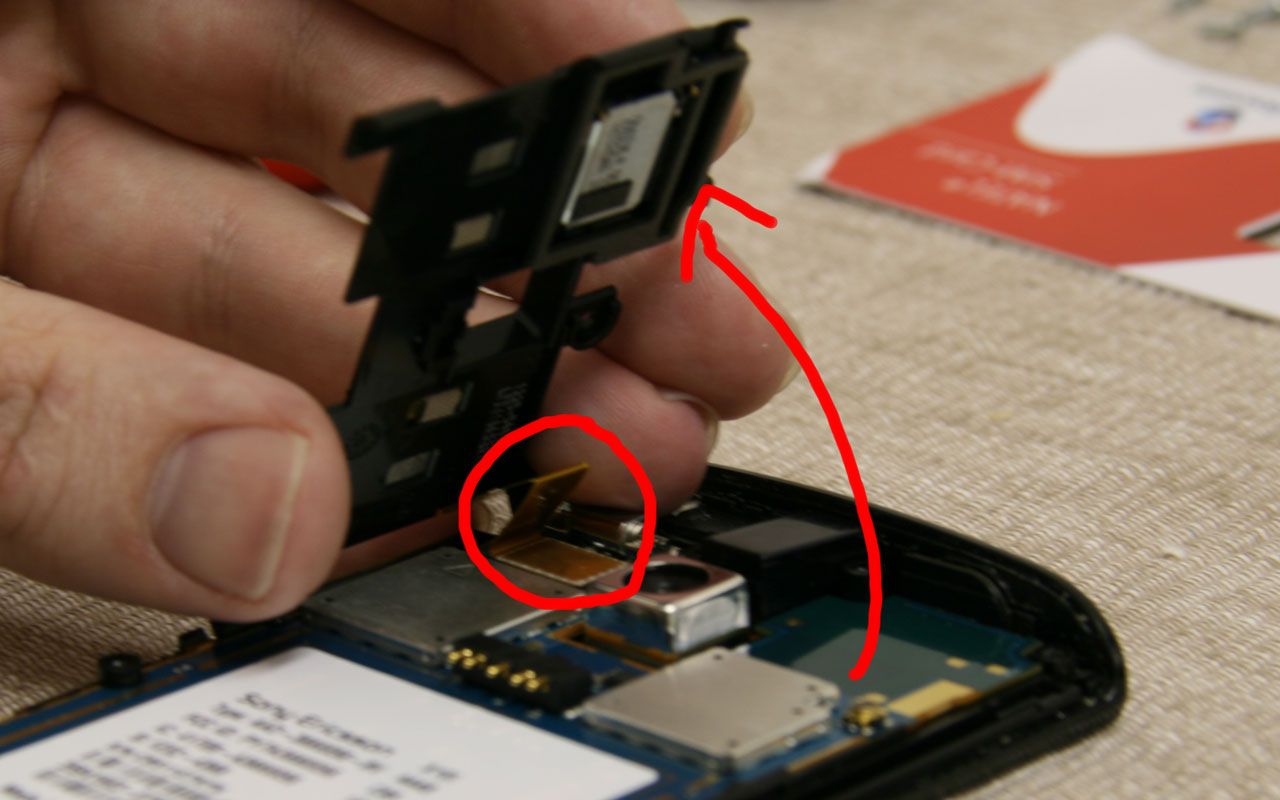
Step 10: Remove audio jack
The picture below shows the ribbon again. Take off the audio jack by simply lifting it with your fingers. The arrow shows you in which direction.
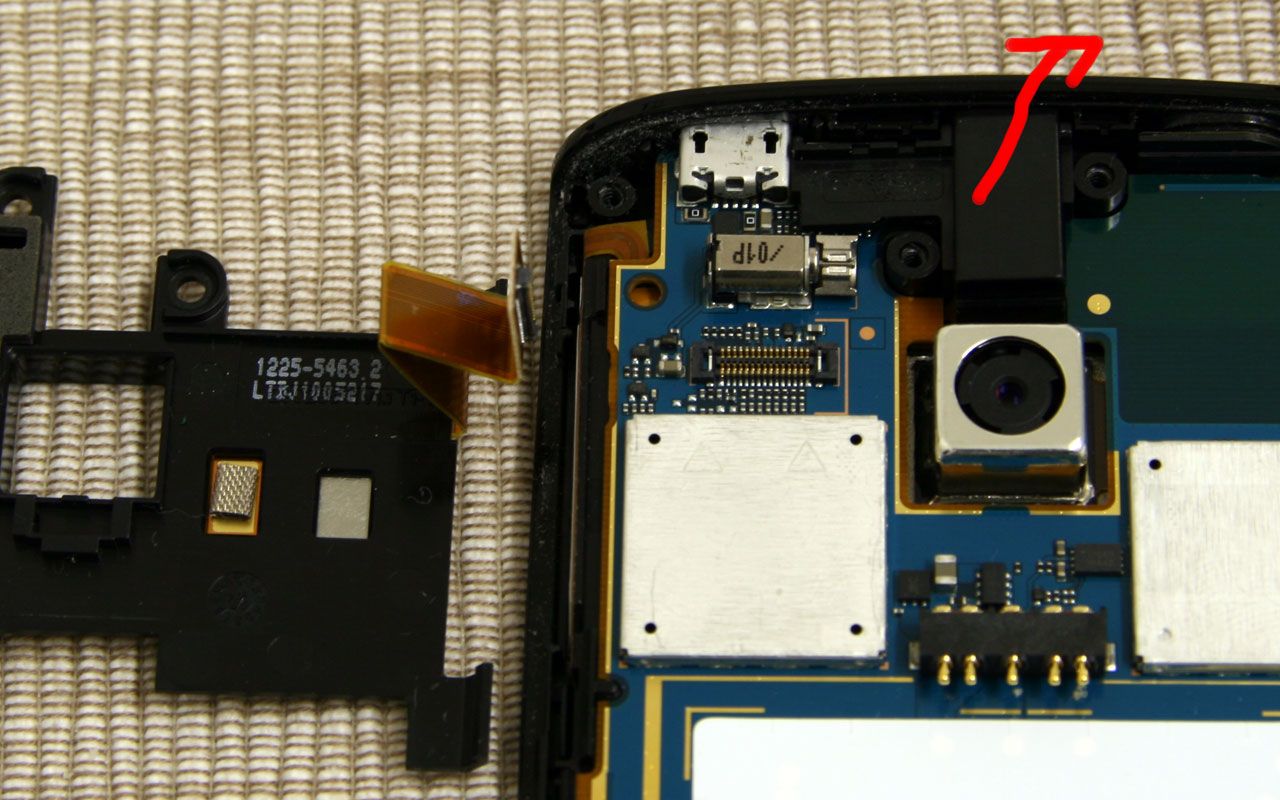
Step 11: Remove ribbons
Now loosen the three ribbons at the lower end of the PCB. Use a toothpick, guitar pick or credit card to remove these ribbons that should come off easily. Do not remove any of the SMD components beside these ribbons. If you do, it will require you to re-solder them back.
Step 12: Remove additional ribbon
Remember to remove another ribbon that sits underneath the audio jack. The red screwdriver is pointing to it in the picture below.

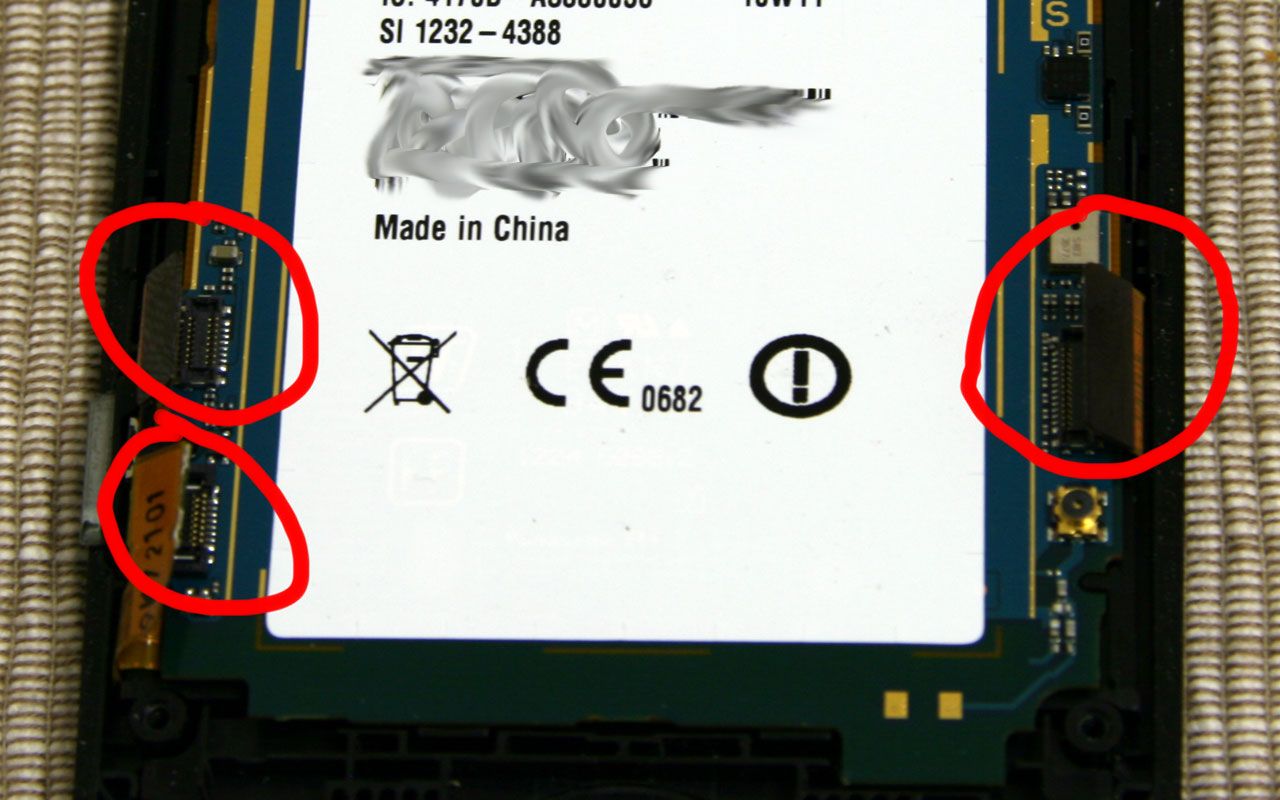
Step 13: Remove PCB
Now you need to loosen the clips that the PCB is attached to on the front cover. The PCB is attached via four clips. Use the straight-slot screwdriver to pierce between the PCB and upstanding part of the front cover. The screwdriver should be placed at a direct angle from the side (see the picture from step 15). Now wiggle a little and the PCB should jump out of the clips. Repeat this on the other three clips. You should now be able to lift the lower end of the PCB and pull it out in a flat angle.
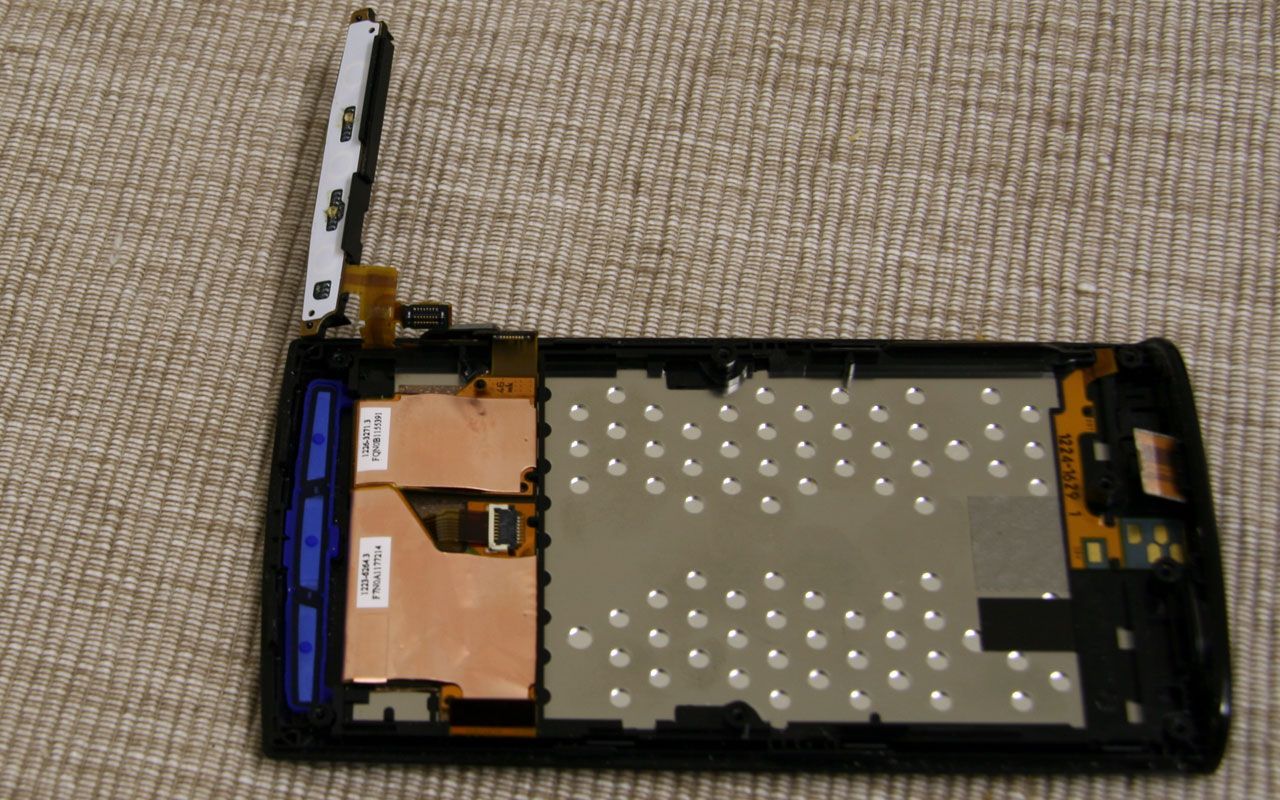
Step 14: Separate display and touch module
Now you will need to split the display, touch module and front cover. Loosen the keypad, but be careful not to tear the ribbon.
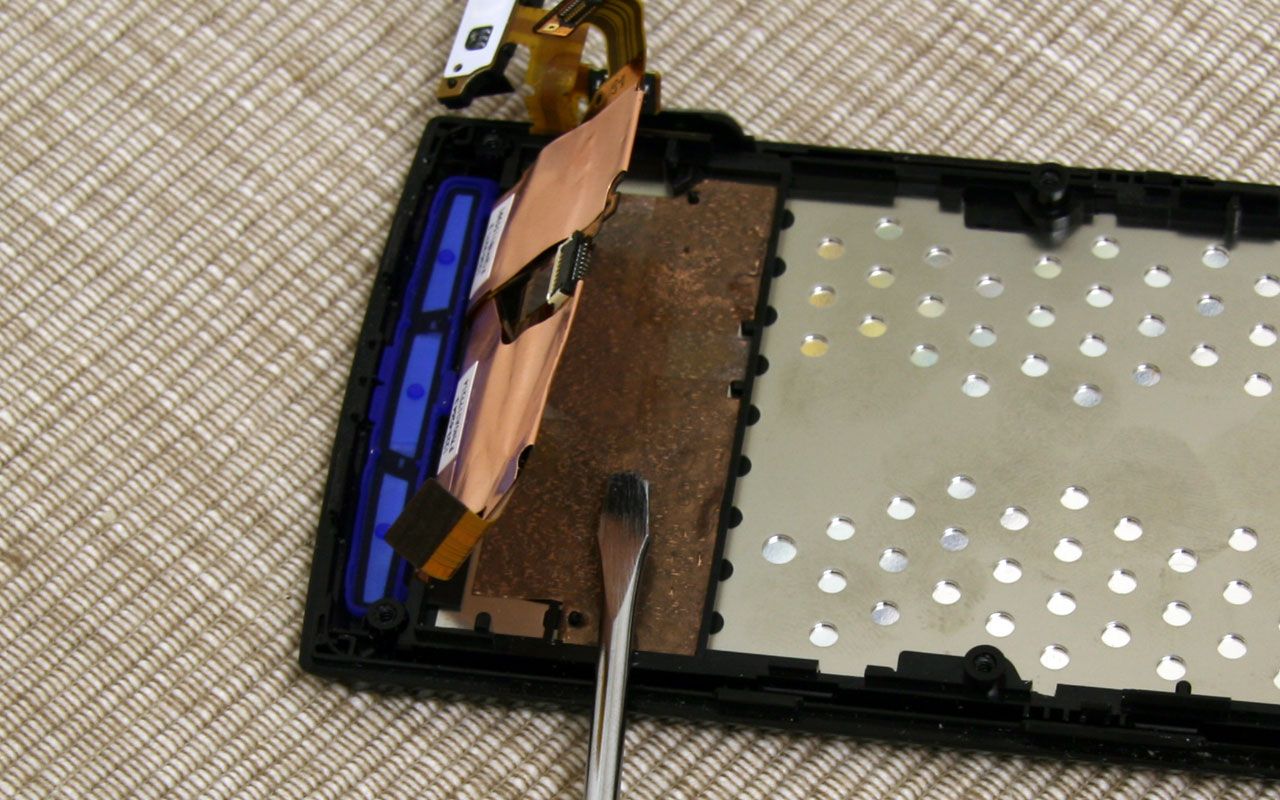
Step 15: Remove copper-coloured ribbons
Slowly pierce underneath the copper looking ribbons. They are glued to the whole area. After you’ve cut a few parts you should be able to remove the ribbons with your fingers, start with the biggest and finish with the smallest one.
Step 16: Remove display
The display is also clipped in the same way that the PCB was. Once you’ve used a credit card to remove the clips it should pop off by itself. That’s it you’ve now successfully disassembled the Xperia X10.
Note: The touch module appears to be heavily glued to the front cover. It may be able to be removed by heating the glue (maybe with a hairdryer) but it hasn’t been tried.
Reassembly
To reassemble the whole phone, simply put it back together in the reverse order as described in the steps above. When reassembling the phone don’t forget to clip the ribbons again. Simply push them into the connectors with your thumb. Don’t forget the ribbon underneath the audio jack and sim, memory card holder. Make sure that all clips are tightened by pressing the display, the PCB and the back cover once around with your thumb.
Many thanks to McKebapp once again. His original (and more humorous) guide can be found here.
115 responses to “Xperia X10 Disassembly Guide”
What kind of a lunatic would do that?!
Crazy…….
Are there any useful/practical reasons for doing this? ‘Because I wanted to see if I could pull one apart and put it back together again’ isn’t one. 😀
this is crazy man!!!!!!!!
did u successfully reassemble it? Is the fone working?
this is so dumb, why would anyone take their phone apart for no reason
@all
This is for the great justice!
This is sooooo NOT pointless it has a great number of advantages to it. First it gives an idea of how hard it was to put this phone togeather, second it shows how much time it takes to take it apart, and third it shows us how to do it if we need to. I bet that who ever scrutinized this person will be very sorry that they didn’t pay more heed to him when they brake their phone and then go paying a good amount of money to get it fixed while the people who read this know how to do by themselves and save their money.
SO thx for the tutorial
I have actually taken my x10 apart to change the cover to white. and i needed the touch module off, and i dared to do what u proposed. i used a haridryer to warm the glue and take it off.. i got a little crack in the right corner of the screen. but got it succesfuly changed. still works as it should.. 🙂
Just wanna say that taking the Touch module off is something i wouldnt recommend. i was scared shitless that i had broken it. i used a hairdryer and a hobby knife..
some pictures if anyone would be curious http://s179.photobucket.com/albums/w300/trustycpl/Phone%20disassembly/
@Mike Sommer
Wow, your phone looks damn amazing!
My X10 was in a damp pocket and got humid inside the unit. No water, just humidity and my screen was messed up. I put it in a bowl of rice for a day and all is dry and normal except for my camera lens cover. It still has moisture drops on it and I cannot take a picture and it has been 2 weeks since the accident.
This is why someone would do this to there phone or pay someone 100$ to do it otherwise. Thanks sooooo much for this info. MUCH appreciated!!!!!
Thanks. Great phone! and battery isn’t too bad with app manager clearing out some processes.
Excellent.
I have an accident at step #10, any idea where I can get the flexible circuit board with the SIM card holder and Memory card holder?
The only reason I would take x10 apart is to see if there’s a front camera (like SE p1i or iPhone 4)….fter all this is there a front video camera or not?
[…] […]
This tutorial helped me disassemble my phone to dry it after it fell in water, and thanks to this everything now works after i reassembled except that people complain my voice is faint when i talk to them.so i was wondering if anyone could point out where the mouthpiece is inside the phone.
[…] in disassembling the phone to switch the colours around (if you’re interested, the Xperia X10 disassembly guide may help). If you can’t be bothered to go through all the effort you could simply just change the […]
@Patricio – cnn.cn is a great place to buy parts for phones. Cheap and very reliable. They only have one ribbon cable for the X10, not sure if it’s the one you need.
this tutorial is great. helped me replace my damaged housing so my phone looks new, and even helped me take it apart so i could spray paint just the chrome edge of the phone (: now i have a black and red phone ~
http://www.facebook.com/photo.php?pid=14303240&l=8da71b1279&id=559120581
@Andrew.
Thanks a lot, sadly they have the wrong one, I need the memory_sim card cable, I’m still looking for.
This is great! My X10 was ran over and I have no insurance on the phone but have sourced the parts needed so this guide will be great for me to replace the buttons, screen, digitizer and case 😀
[…] […]
I found it very helpful, as I was not sure how to open it and didn’t wanted to cause any damage, so i’ve followed the instructions and managed to open it and fix my set.
Thanks.
To ppl who says pointless, pls remember everything has a reason beind.
🙂
Where is humidity sensor in X10 ? What color it should be normally?
Hi, Mike Sommer if your still using this site, how can I get in contact with ya? I got a few questions about replacing front cover on my X10 due to scratches.
[…] das ist das teil darunter und der teil drumherum ist die abdeckung mit dem 4-eckigen loch drin… http://www.xperiax10.net/2010/05/10/…ssembly-guide/ siehe schritt 7, 8 und 9…. dort drin sitzt der lautsprecher den du auf bild 9 etwas erkennen […]
My X10 get dropped in my salt water pool and although everything works (luckily) after putting into rice after two days, the screen shows streak of water trace, may be due to the salt. I am wondering whether I can unglue and take apart (or just open up a bit) the touch module from the front to clean it? Hi Mike Sommer, could you share your experience?
i use your post. thank you .
http://www.xperiax10.net/2010/05/10/xperia-x10-disassembly-guide <<i use your post.
sorry.. http://cafe.naver.com/disassemblemachine/5 <<i used your post. Thank you.
First of thank you for the great disassembly Guide despite the criticisms of some,im going to buy a new case due to the old one being battered round the edges,im just woundering if anyone one has successfully removed the touch module with out damaging it? and will i need some kind of glue with the new case to put it back in?Thank you very much for any help on this matter..
hi, thanks for the great guide to disassemble my phone. i did it exactly as you have guided. i need to replace USB/charger socket… could anyone help me…. many thanks..
I was thinking about doing that because i dropped my phone and the buttons on the front are scraped up (no more chrome 🙁 ). would it be hard to replace them?
Cmon guys?
Why should this be unusefull?
What are ya gonna do if the screen broke? of course, dissambly it to replace it!
Thank you very much!
My phone wasn’t charging, I took it apart using this and realised the sim car/ micro sd board was shorting out on the mainboard. It seemed to be the heat sinks, so I coated them in a little silicone heat compound and voila it is charging again! 🙂
Thanks!
No Way….. This is Crazy. a Pros gota do it for me
hey can someone tell me how to put a new cover
this is the link with the cover its a full cover thanks
http://www.mytrendyphone.com/shop/sony-ericsson-xperia-29113p.html
If anyone who need back battery cover, please buy it on my website, thanks
http://www.acceport.com/original-sony-ericsson-xperia-x10-mini-pro-back-battery-housing-faceplate-cover-case-red.html
can anyone help me with my phone? it got wet then none of the buttons work. actually when i turn my phone on for the first 30 seconds they all work but after that only the touch screen and the power button work. so the phone is now useless! no back or home button! anyone knows whats the problem?! i disassembled it but every thing looked normal from the inside.
Well, i took my xperia x10 apart, i had to. My usb port is not working at all. Cant charge it or data tranfer via my pc. Turns out that the soldering has come away from the circuit board. Any tips on the best way to go about this????????
abc: Many people, like myself, NEED to disassemble their phone in order to replace a part that is defective, and have no insurance and/or warranty on the phone.
Thanks for a great guide! Now I’ll just get the part I need and break out the tools 🙂
The reason for this demonstration is quite simple, it is to familiarise us to the procedures necessary to access the phones hardware , and also if there are any hardware faults we may learn how reach and repair the affected component.
i have my xperia x10i but it its dead now because some parts would it blown, thats why i was pulling out from the board, lastly my x10 was drop to the floor, until it was come to hang up then off again, the power was on and off after a week my phone is totally dead now. to checking up the board, i was saw some kind of spare parts blown, i dont know what’s role of this parts, if you know what is it pls help..
and i hope you give me some answer of what could be the function of thi parts…
king_0325@yahoo.com
[IMG]http://i53.tinypic.com/b9ak1z.jpg[/IMG]
i have my xperia x10i but it its dead now because some parts would it blown, thats why i was pulling out from the board, lastly my x10 was drop to the floor, until it was come to hang up then off again, the power was on and off after a week my phone is totally dead now. to checking up the board, i was saw some kind of spare parts blown, i dont know what’s role of this parts, if you know what is it pls help..
and i hope you give me some answer of what could be the function of thi parts…
king_0325@yahoo.com
http://tinypic.com/r/b9ak1z/7
hi, urm my phone stopped charging so i need to take it apart, why wont my screws come out? i have unscrewed them, they are all very loose but wont come out? why is this?
Worked great!! Broke the glass on my brand new X10, bought a new spare set on the web, have used 30minutes and its WORKS!!!!! Perfect!
Tips from me, use a clean surface to work on(we don`t want dust on the touch screen..)
Remember to but the on/off rubberbutton in place, I forgot and had to de/re asemble twice…!
@ SP=K JELS OF NORWAY: I have also broken the glass on my X10, the LCD panel is fine as is the touch but the screen is a bit cracked and looks to be getting worse. You’ve given me confidence that it can be fixed without having to replace the phone but where did you get your replacement glass from?
I did everything in the tutorial to replace the housing to white. But now my buttons on the front don’t function at all. Has this happened to anyone else.
Hi can you just remove the glass screen without taking completely apart? on a x10 thanks.
Could someone please tell me what is the part that you removed in Step 4 called?
I need to purchase a new one.
Thanks for any help offered.
hi all!
i had usb connector problem since then i was searching a guide to dissasemble my xperia the first time i went through this guide i succesfuly done some steps until the hard time arrived when the second cover was to remove , then i stuck tryng with every tool to losen the upper cover , then i tried youtube and that was easy and amzing guide which was done by some guy and he used his nails rather then tools , i would suggest you guys if you didnt succesfully by this method then search by youtube
@Boberts I have the same cracking and i think this is what we need: “Digitizer Touch Screen for Sony Ericsson Xperia X10” Search those terms on EBay and you will find many of them. Some come with some extra tools to help you take apart the phone. Even though it is the very top part I guess the entire phone still needs to come part. I was hoping to be able to pry just that level off and replace.
And if you are looking for the youtube that mentions search for “Xperia X10 Disassembly Walkthrough” by darkgoth678 on Mar 10, 2011
And if you are looking for the youtube that @zakhl mentions search for “Xperia X10 Disassembly Walkthrough” by darkgoth678 on Mar 10, 2011
thank great right up just changed my digitizer. I noticed that step 4 is not needed to be down unless you want to remove the wifi/blue tooth antenner
Thank you for this guide.It was job for 15 minutes and now i have no more dust under the screen and no more warrancy :D,anyway in short time warancy expire.sorry for my english .
Hi folks
Great info on dismantling phone I had phone in for repair 2nd time same fault! this time the engineers report said it could not be repaired and they supplied a photo of the damaged circuit board it stated that the repair was not covered under warranty. As the phone was scrap i took it apart and guess what The board is nothing like the one in the photo. I have taken my own photos and will be sending in a complaint to the company who will be named &shamed VODAFONE If they are going to tell lies they could at least produce a photo off the correct phone parts I would never have known they conned me had i not taken it apart
I need the logic board and the screen as water killed the mini x10 I have, any ideas where you can get parts?
Thaks man my usb port was defekt but I have fixed it with yout guide 😎
Jale29: I have had a problem with USB too, and now I can’t even charge it anymore… please explain more of how you did to fix it..!
Thank you very much, I had to replace a cracked screen and this was invaluable as i could find how to do it anywhere else. I have now become good at it as i left some finger prints on the inside of the screen and had to take it apart twice.
Thank you again
Thanks very much, I had a cracked screen courtesy of my 5 year old dropping it and I was quoted £100 to get repaired, paid £20 for the screen off Amazon followed your instructions along with a youtube vid and replaced it myself. Like the guy above I’m pretty good at taking it apart as I forgot to put the on/off button back in so had to dismantle it all again. Thanks
[…] hi, guckmal hier http://www.xperiax10.net/2010/05/10/…ssembly-guide/ […]
help ive followed all this to change my housing and now touch screen doesnt work help plz my beautiful fone is spoiled
Since this phone has become essentially a brick due to an apparent(blatantly obvious, really) manufacturers’ defect, I figure what have I got to lose by opening this P.O.S.(piece of shit) up and trying my hand at a home repair. Regardless, I still want to TRY to it without TOO much damage to the unit. So THAT is why I am thankful for someone else doing it first and sharing their experience with the rest of us poor saps that were enticed into buying this gussied up P.O.S.(pile of shit!). Wish me LOTS of luck.
Ordered a white casing to replace the black. Should be here tomorrow…so i’ll be following this guide. Good luck to me 😛
[…] voor stap uit elkaar kunt halen en ook weer in elkaar kunt doen. Hoop dat je er wat aan hebt. Xperia X10 Disassembly Guide | Xperia X10 Blog Groetjes […]
[…] có phần cạnh sát mặt trước không dám mạnh tay sợ đi lun cái mặt trước http://www.xperiax10.net/2010/05/10/…ssembly-guide/ bác vào đây koi có hướng dẫn luôn đó. mạnh dạn đi bác, bác mà nhát tay thì […]
to all those in need… i found both a white and black replacement case on ebay for my x10. just $9 each. bit look around first, cause the price varies to over $30. the tools are there also, for $2. cases come with everything external. all buttons and chrome pieces. thanks for all the help forums…
Works perfectly .. the instructions are very good..You just have to be handled carefully and know that the glass remains the same color and only replace plastics…
Can any one HELP ? I had crack lcd and digitizer so I replaced ,was so careful as I have fixed mums iphone 3gs my ipod ,blackberries and Nokia x6 in the past . But this time my xperia x10 has BLACK SCREEN the back light works so dos on and off the sound and the digitizer all work I have tried flashing to new OS with pc suite by swiping and tapping when prompted by suite but still black screen all ports look ok on logic board and it was working fine before replacing lcd and digitizer ,please please HELP
1st i want to say thanks!becaus i have one x10 touch screen broked,now ican change the touch,,,thangs again friend….take care
awesome instruction! just took apart my x10 a few minutes ago to remove something in the middle of the screen which i have no idea how it got there (big ass dust). putting it back on was a breeze.
[…] einzubauen? brauch ich nur diese platine? ja ist nicht all zu Schwer, sehen hier mal nach Xperia X10 Disassembly Guide von wo du ja auch schon dein Bild hast. […]
thank you!
anybody tell me how to replace the ear piece speaker please
Hello,
I have a little problem. Which sticker I must use for paste Touch Screen Digitizer??
[…] LCD Screen for Sony Ericsson Xperia X10 And here is how to completely disassemble the x10: Xperia X10 Disassembly Guide | Xperia X10 Blog That, or find a cell phone repair store. I assume your phone is no longer any sort of warranty? […]
Ok, I broke the keypad connecting cable whoops! how can I fix it? thanks
Thanks McKebapp!! My sons phone had liquid damage and wouldn’t charge, this helped greatly to strip down & clean around the components.
I don’t understand these stupid comments.
This tutorial is awesome and very easy to follow if someone will have to fix their X10.
Good work!
Thank you,.Really it is helpful……….Keep it up 🙂
Thanks fo this very useful info!
ok just taken mine apart and sucessfully didnt damage it further, i need to replace the digitizer and in my opinion its the hardest part to do, tried the hair dryer thing and it was still fairly stiff so gave up and re assembled it with no issues, if it was a better phone i would be tempted to try again but im gonna sell it off for spares
a BIG thanks for this guide without it i would have killed it for sure!!!
hi friends after being offered only a low 30 uk pounds (about 50 dollars) for it as spares i was pissed off, so i attempted to remove it again and the good news is that i was successful so my advice is that if you are patient then you can do it just make sure you disconnect and connect things properly and dont forget to put the on button before re assembling like i forgot to do
good luck!!!
I like to thank you for posting this. My daughter scratched the glass and was in very bad conditions, and was not working properly. I followed the instructions by the “T”, I order the glass part I think is the “digitizer” part and now my phone look like new. I asked a technician how much he will charge me to fix it and he asked me for $120.00. I only spent 3 dollars on the tools, 9 dollars on the part and I did it myself. I saved 107.00 just reading and following this directions. Thanks thanks thanks much for this.
nice one our kid great guide as i need to replace digitizer man,ignore these fools who say leave it to the pros, in my eyez it not pro v con its the pros are a CON thanks agaon our kid
i was getting no network/ no service issue for last 1 week and just to try one bit i accidentally placed a small piece of hardpaper in the sim slot.
i removed the black cover .. flushed out the paper and placed the same.
now the problem is i am not getting the display back..
The leds on the on the 3 keys below do light up with slight lighting up on the screen but no display.
What could have went wrong .. something i need to check. Please advice . many thanks
regards
dipesh
アフリカの司祭の古代ビーズのバッグからオートクチュールへのレジャーの近代的な女性のトートバッグ、ハンドバッグは、歴史的に秘密のキャリアとパワー、ステータス、および美の記号表現の両方されている。 [url=http://www.coachjpoutlets.com]コーチ アウトレット[/url] 日常生活の機器の番人として、ハンドバッグが強くそのようなお金の開発、宝石類、輸送、化粧品、喫煙、携帯電話、そして社会における女性の役割として、技術と社会の変化によって影響されています。記号とコンシーラー、心理的な解釈がじれったいの無数に向かってハンドバッグのジェスチャーの両方として、その逆説的な役割を抱きしめる。ハンドバッグの内容は、フロイトの無意識の一部を表すものとして見られていると、袋自体が(空のレセプタクルのような)女性の性器あるいは子宮と解釈することができます。確かに、単語 “財布”は17世紀の女性の陰部(スティールとBorrelli 1999)スラングであった。古代の、象徴的、不可欠、ハンドバッグ(と運ぶ)が着用し、その時間の両方のニーズや好みを表現し、カメレオンの対象となっている。
ビクトリア朝時代の科学と産業の発展は、女性が自分の服の残りの部分と調整することができるスタイルとファブリックの広大な配列を作成しました。 [url=http://www.coachjpoutlets.com]コーチポピー[/url] ポケットは1840年代に返されても、女性は財布を持って、しばしば彼らの袋(ウィルコックス1999年)の日付と自分のイニシャルをマークし、潜在的な夫のために披露するためにそれらを刺繍膨大な時間を過ごすために続けた。以前の時代の家庭生活の理念に沿って、多くの女性は、大規模な装飾されたクラスプ(フォスター1982)腰ベルトに取り付けられているchatelainesを身に着けていた。しかし、鉄道の出現で、バッグが革命を体験しようとしていました。 1843年に、英国の鉄道線のほぼ2000マイルがあった。より多くの人々が列車で旅し、多くの女性がより多くの携帯電話になったとして、プロの荷物メーカーが鉄道旅行のためのそれらに馬の旅のスキルになっており、すぐに用語 “ハンドバッグ”は、これらの新しいハンドヘルド荷物袋を記述するために浮上した。確かに、今日のハンドバッグのトップの名前の多くは荷物メーカー(ドレスメーカーによって作られた以前に作成した財布やポーチとは対照的に)としてのスタートを切った。 Loius·ヴィトンがパリの金持ちのための荷物パッカーだった一方、例えば、エルメスのバッグは、ティエリー·エルメス、ハーネスとサドルメーカーによって、1837年に設立されました。現代のハンドバッグ、ポケット、留め具、フレーム、ロック、キーを使用して荷物にはまだ言及(スティールとBorrelli 1999)。
ハンドバッグは、現在のスタイルや素材など、防水キャンバスとして、宇宙時代の合成と、のどの爬虫類の皮の途方もない配列で作られています。 [url=http://www.coachjpoutlets.com]コーチバッグ[/url] デザイナーは、両方の袋の内容を公開し、隠すことが透明な材料をハンドバッグに内在するパラドックスでプレイし続けています。とあまりにも長い間フェミニンに関連付けられていたハンドバッグは、現在の男性ともっと人気が高まっている。現代の男性と女性の両方が、ハンズフリーバッグの上にストラップやスリングができて行く。その多様性と適応性は、ハンドバッグの並外れた力と持久力を強調表示します。
コーチは、1941年に設立され、スモールレザーグッズ業界の主流となっています。 [url=http://www.coachjpoutlets.com]コーチ アウトレット[/url] その名前が、精巧に細工された、皮革製品、高品質と同義である。有名人や “通常の”人々は同様にすべての時代を超越したスタイルをむさぼって。それは68年間されているにもかかわらず、世界中のすべてのコーナーから世界中の人々、彼らの気前作られた製品のために、まだ叫び。オンライン割引コーチのバッグを見つけることは最高の状態では困難であり、もちろんそれは袋が本物であることを保証するのは非常に難しい。コーチは、その高い基準を維持し、上質の強固な評判を保護するために決定されるので、その袋ではなくオンラインではなく、れんがとモルタル店で購入したいと考えている。
マークダウンされたコーチのバッグの他のオンライン情報源は、 [url=http://www.coachjpoutlets.com]コーチ アウトレット[/url] 通常、提供する上で、ページまたはコーチバッグの二つがありますデザイナーの輸入である。割引がかなり小さくすることができ、輸送費が含まれているときには、れんがとモルタル店で良くやってしまうかもしれない、しかし、注意してください。あなたが欲しいものをコーチのバッグがわからないとお店であなたにアピールするには、あなたがバッグを “借りる”ことができるオンラインの会員クラブである、借用またはスティールバッグであなたの運を試すことができる何かを見つけることができない場合毎週有料ではなく、 “行わない”と “静かに運ばれた”カテゴリで袋を整理し、そのアウトレットで買い物をする。これは、信頼が本物であるとあなたが管理することができます価格であることを受動またはマークダウンされたコーチのバッグを得るために本当に信頼性の高い方法にすることができます。あなたはそれがあなたのための袋ではありません決定した場合と、あなたは常にしようとする誰かのためにそれを利用できるようにすることができます!それは最高でリサイクルしている。
デザイナーバッグに{|例えば|例えば|などを含む|のように}は{|バーゲン|スーパーホテル|格安ホテル|お金が情報を保存するお得な}を探している|ことをコーチ、それはにあなたのために{最高になりますべきです。|ので、できること|あなたができることを|提供されている| |こと}が利用可能な選択肢が{があることを知っている使用可能| |あなたのニーズに}得ることができる存在している。[url=http://www.coachpopfactory.com/]{コーチ バック|コーチ 財布|コーチ マディソン}[/url] 興味のあるバイヤーは、{の要求| |検索| |のための外観を求める求める}べきであるコーチハンドバッグアウトレット店{ので、彼らが|というだけの理由で、彼ら|彼らは以来、|というだけの理由|彼らはその与えられた}利用可能な株式の{トンを持っている|それが提供されています|可能| |あなたの欲求のために}得ることができる存在している。その株式は余剰{このような理由| | |理由だからこそこれは|なぜそのことが理由です}はそれらのいくつか{取る|考える|取得|キャリー|取得} |によって引き起こされるマークとマイナー欠陥が{によってもたらさ|欠陥| |欠陥|障害|弱点}}出荷や製造上の欠陥から{|ための|の結果として。コー??チのハンドバッグアウトレット店は{得ている|はなってきている|受信している|となっている|はますますなってき}大量注文にこれらの項目{することができます| | |です。どのあるかもしれない|されているどの} |を彼らは{与えることができる理由オファー| |電源|できるように}お客様巨大な控除{に比べて|と比較して| |と比較して|と比較した場合のために|で|に|の|と比較した場合}で{配置されているお店を提供します}モール。コー??チのアウトレット店は、{もすることができます|またかもしれない|することができます|もできます。|またされます} {|デパート|店舗|ショッピングモールショッピングの場所を}リーディングで見つかりましたが、[url=http://www.coachpopfactory.com/]{コーチ バック|コーチ 財布|コーチ マディソン}[/url] その価格はと比較して、{低いです|と比較した場合|ブティック}に比べて|と比較して、|に比較しています。
85アウトレットショップ{|と比較するために|と比較して|と比較した場合、|などに比べてより}このごろ、多くの存在{することができます| | |あるあるかもしれない|されているどの}マーチャンダイジング·コーチと{多くの| |}ほとんどが様々な状態で配置されているので、{そうはなりませんよ|それらのほとんどは|それらの多くは|それらの多くはなくなり|あなたではないでしょう|あなたはしない|する必要はありません}の持っている{探しの検索では|求める|検索しよう|が|捜し}に苦労して。それはもう秘密ではありません{その|方法| |このこと|} {|他のと一緒に|や他だけでなく、[url=http://www.coachpopfactory.com/]{コーチ バック|コーチ 財布|コーチ マディソン}[/url] 他の|も|その他と共に}コーチハンドバッグの価格の製品は{非常に高価ですに比べて|と比較して| |と比較して|と比較した場合、市場の| |市場で入手可能|そこ|市場のバッグ{}の他のブランドに比べて、なぜ今日、すでに市場にはない}つまり{場合であっても|かどうかに関わらず| |財布| |バッグ|トートバッグ|あなたがコーチ{ハンドバッグ訪問}の場合に関わらずに比較して|と比較した場合、| |クラッチ}アウトレットストアを、価格に比べて{依然として高くないにも関わらず|たとえと比較して、|他のアウトレット店{今日}と比較すると、|これらの日|最近|今|現在}。ちょうどコーチのバッグ{しない|とだけではなく|しない| |に加えて、あなたは{|購入1 |選択|き|に投資して購入}していること|あなたは{常に覚えている常に心に留めておく}する必要がありますかもしれません| |は|だ|}だけではなく、任意の通常のバッグは、{それは販売されて}確かにあることを確認します。 {このような理由で| | |理由だ理由はその理由です|なぜこれが}本物の革{から構築から作られた|から生成| |で作られた|から作成}されているコーチのバッグ| |高価なそれはかなり{高価である高価|高価|価格の高い}。あなたは{|心のクマ|心に留めて忘れない|考慮|検討する必要があります}いくつかの考慮事項があります購入する前に{袋を|キャリア| |トートバッグ|ケース}。確実| |特定の快適さ{保証されます{あなたのように|あなたのことを意味する| |あなたのことを意味しあなたのように}あなたは、常に使用するものは、{のためにオプトインする|検索|選択| |選択を選択し}する必要があります|確認|}保護された。
Louis Vuitton,Louis Vuitton bags,Louis Vuitton workshop,Tender thanks you altogether much on account of your abide always our workshop! We possess products readily obtainable in our Online Against Louis? Vu~itonda series of Damier Louis? Vuitton da gladstone bag,or a Louis Vuitton purse. Items in the are skinflinty,the quality is wonderful. Our audience is also entirely popular. Not cricket c out of commission rebate being held,it is worth to attain the famous break weighing down on! All products are free shipping it to Japan! Offers a ok champion ceremony to purchase with concord of mind to everyone.
[url=http://www.lvbagssalesjp.com/]ルイヴィトン[/url]
[url=http://www.lvbagssalesjp.com/]ルイヴィトンバッグ[/url]
[url=http://www.lvbagssalesjp.com/]ルイヴィトンショップ[/url]
コー??チ財布、コーチ財布を購入することは、価値のある投資である。[url=http://www.coachcheapjp.com/]コーチバッグ[/url]高品質の仕上がり、細部へのこだわりと、最先端のファッションデザインは、洗練された人々が望むものをコーチ財布を行います。
現在高品質の革、耐久性のある署名ファブリック、[url=http://www.coachcheapjp.com/]財布 コーチ[/url]コーティングされたキャンバスから作られたコーチから入手可能な100以上の財布があります。あなたの好みの腕輪、クレジットカードホルダー、封筒のスタイル、またはスリムラインメンズ財布であるかどうか、コーチはあなたのファッションセンスが明らかになります。
同社は、1941年に発祥し、マンハッタンのロフトで、??家族の営む事業として始まった。現在、世界の存在が、それがすべて始まったところ、コーチの本社はまだ34thストリートの同じミッドタウンの場所に残っています。
他のスタイルは、右の仕上げを選択する限り、あまりにも、古典的な空気を放つことができます。たとえば、パーカーのスタイルは古典的なラインと上品なプリーツで定義されています。革で行われた場合、それは非常に伝統的なようです。しかし、あなたは明るい色のオプアートメタリック生地でパーカーを選択すると、印象は非常に異なっている。[url=http://www.coachcheapjp.com/]コーチバッグ[/url]コー??チのデザインの美しさはあなたが最良のあなたの性格を反映した選択をすることができるということです。
コー??チ財布を購入することは、[url=http://www.coachcheapjp.com/]コーチ 格安[/url]価値のある投資である。高品質の仕上がり、細部へのこだわりと、最先端のファッションデザインは、洗練された人々が望むものをコーチ財布を行います。
コーチ製品の需要に追いつくために、同社は、 [url=http://www.coachbagsjpsale.org]コーチバッグ[/url] 人員を倍増工場出荷時の操作のための追加スペースをリースし、6日に作業週拡大しました。これらの措置にもかかわらず、1987年の秋までに、コーチは再びその商品のすべての注文を満たすことができませんでした、と同社は、拡張用の追加の部屋を求めるようになりました。さらに、優れた製品が販売された環境を制御するために、コーチは50%で、その商品を小売部門の店舗数を削減。引き続き旺盛な需要にもかかわらず、同社はレザーのコストの高騰と歩調を合わせ、その価格を増加させなかった。 1987年の年末までに、コーチはほぼその小売店の減少と革の価格の上昇にもかかわらず、その収益を倍増していた。
1985年7月に、 [url=http://www.coachbagsjpsale.org]コーチ(Coach)店舗[/url] Cahnsまた、食料品や靴下を販売したサラ·リー株式会社との契約を固めた。約$ 30万であると報告された合計と引き換えに、コングロマリットは、同社の工場で、その6つのブティック、ニューヨークのマディソンアベニューに旗艦店を管理した。サラ·リーは、それが常に実行されていたようにコーチを動作させるために継続することを約束した。販売の時点で、Cahnsは年功序列に基づいて、200長年の従業員との収入の100万ドルを分割します。社長としてコーチのリーダーシップを引き継いで、ビジネス開発担当副社長として1979年に入社したルー·フランクフォートであった。
売上の大部分は軽量の革と新形状の袋を特色にした製品の新たに導入されたコーチのライト級ラインから来るように期待されていた。 [url=http://www.coachbagsjpsale.org]コーチ(Coach)店舗[/url] この行は、暖かい天気が軽量のハンドバッグは、より望ましいした南と西に住んでいた女性にアピールすることで、同社の顧客基盤を広げることを意図していた。ライト級ラインは、トープ、アクセスの容易さのための小さいサイズ、および軽い春の色、ライトブラウン、ネイビーのハンドバッグを特色にした。この行は、すぐに会社全体の売上の15%を占めるようになりました。
その新しい所有者と新大統領の下、同社は急速な拡大のために準備。 [url=http://www.coachbagsjpsale.org]コーチアウトレット[/url] この拡張のための基本戦略は、コーチの名前を退屈させる製品の数に追加すると、これらの商品を購入した顧客の数を増やすことでした。したがって、同社は更新されたクラシックラインのハンドバッグのいくつかの新しいスタイルを追加し、また分布のそのチャネルの大幅な拡大を始めた。初期の1986年に、新しいブティックは、ニューヨークとサンフランシスコで、二つのバンベルクの店舗でメイシーズ店で開かれた。追加のコーチのアウトレットは、デンバー、シアトルの店舗で建設中だった、との協定は今年中に他の主要百貨店内で同様のブティックを開くために達した。加えて、コーチはニューヨーク、ニュージャージー、テキサス、カリフォルニア州のショッピングモールで、独自の店舗をオープンしました。 11月まで、同社は大規模な百貨店内で約50のブティックに加え、12店舗を展開しました。同社は、拡大が2,500万ドル、前年比45パーセントの利得は、1986年の売上を押し上げるだろうと予想した。
1983年Cahnsは、 [url=http://www.coachbagsjpsale.org]コーチ(Coach)店舗[/url] ニューヨークでのビジネスから週末の転換として、バーモント州で300エーカーの酪農場を購入しました。プロパティが別荘と退職先を提供することを意図していたが、Cahnsはまもなく農場を買った後のブランド名 “コーチ·ファーム”の下にヤギや市場のヤギのチーズを高めるために始めました。 1985年、彼らはバーモント州とニューヨークの間で週2回通学しました。その年の夏に、3人の子供のどれもが家族革製品事業を引き継ぐためにすべての欲望を持っていないと判断した後、Cahnsコーチを売却することを決めた。
本当の誘惑の素晴らしく楽しい気持ちであなたを記入します絶対に魅力的なコンテンツや美しい写真とファッションと歴史の組み合わせ。 [url=http://www.bagscheapjp.com]バッグ激安[/url] バッグは、彼らが効果的に彼らがで輸送するために必要なすべてを保持することができませんでしたので、人々は彼らと周りに運ぶために貴重な何かを持っていたが、袋が含まれている項目はtime.Peopleにわたって変更された袋を運んで以来、私たちの日常生活に欠かせないされている手。バッグは、彼らが一度に多くのものを運ぶことができました。
典型的な女性の典型的なハンドバッグは、基本的な物事の特定の数に加えて、彼女自身の個々のタッチを含んでいます。それは袋をいっぱいに個々の感じです。いくつかの項目は、袋が開かれる瞬間をロールアウトするのはかなり確実である。 [url=http://www.bagscheapjp.com]バッグ通販[/url] すべての女性のハンドバッグは、それ自体が失われました部門です。それは奇妙であるが、物事は実際に魔法のように、そこに消えます。彼らは最終的に3つまたは4つの調査後の表面上に再び表示され、その内容の乱雑が完了しました。すべてのバスの運転手は、宿命的に彼女のハンドバッグの奥にあるニッケルを捜している間の通路がなければ女性を持つことに辞職されています。
用語のハンドバッグ ‘最初の1900年代初頭に登場し、それが男性に使用された荷物の袋を運んで手に一般的に呼ばれています。これは女性に人気となったハンドバッグの新しいタイプのためのインスピレーションを開始しました。 [url=http://www.bagscheapjp.com]バッグ通販[/url] ハンドバッグは、複雑なファスナー、内部コンパートメントとロックを持っていた。この新しい方法での作成はオペラグラスとファンのためのユニークなコンパートメントの宝石商で来た。 1920 hemlinesと軽い布の服を変更するとファッションの革命で爆発している。完全に女性の服にマッチするとスタイルの女性は人形を運ぶ袋の必要性はもはやありませんでしたマッチしたバッグを完了し、それらとまったく同じように服を着せた。戦争のための努力の衣類やハンドバッグで1940年代もたらした新たな緊縮財政。金属や皮革が不足して当然だった、ハンドバッグメーカーはプラスチックや木材の使用になったので。
事業は1854年に形成され、荷物はハンドバッグのデザインへの道を与えるために開始されました。 [url=http://www.bagscheapjp.com]バッグ激安[/url] 今人気のノエ袋は、もともとシャンパンの5本を運ぶために行われ、それの成功は、高級な女性はどこでもこのエレガントなバッグを運ぶために始めたので、驚異的であった。ダミエキャンバスのデザインは1888年と1896年にそれがデビューしていた、おなじみのモノグラムデザインは、彼独自のスタイルをコピーしていた彼の競争相手によって行われたレプリカをしようと対抗するために発足しました。モノグラムのロゴは、湾曲したベージュ色のダイヤモンドとはめ込み4ポイントスターとLVのイニシャルを交差で構成されています。デザインは、それが負で構成されるはめ込み四つ葉の花が付いているベージュ色の円のことで継続されます。 PVCコーティングは、それ自身のデザインとエンボス加工のファブリックに追加されます。今日ルイ·ヴィトンは、まだ最高の品質を表し、これらの基準を満たしていないそれらの工場から来ている任意の財布は破棄されます。この会社は3世紀のための時間の試練に立って、ハンドバッグのファッションの歴史の力であり続けています。今日、コーチは、女性の靴、男性のブリーフケース、新しいジュエリーライン含む完全なコーチのコレクションを運ぶ米国で25店舗を運営しています。 6人がニューヨークとハワイで2に配置されています。他の場所は、イーストハンプトン、ニューヨーク、フィラデルフィア、ナッシュビル、アトランタ、ヒューストン、ボストン、ロサンゼルス、サンフランシスコ、スコッツデール、シアトル、ワシントンDC、ウエストチェスターカウンティー、ニューヨーク州にあります。
彼女のハンドバッグのない女性は、砂漠の放浪者として失われた感じ。彼女はそれが大たいと考えています。彼女が今不足して成長して、革でそれを得ることができない場合、彼女は布、毛皮、あるいはプラスチックでそれを取ることになります。ハンドバッグは、彼女の消耗品の可動ベース、彼女の予想されるニーズのデポです。これらの最終的なニーズははるかに想像力のいずれかの男の力を超えた程度に手を差し伸べることができます。女性のハンドバッグは、神秘的なダンジョンです。それが彼女の本当の自己への鍵です。多くの詩的な概念に平凡な答え。 [url=http://www.bagscheapjp.com]バッグ通販[/url] 魔術師は彼のトリックを説明したいことはありません。クローズハンドバッグ約タブーのオーラがあります。すべての女性は、その神聖なプライバシーに誰かの視線であれば不安な表情を持っています。彼の仲間が彼女のバッグを開くたびにまともな男は常に巧みに天井を凝視する必要があります。彼は、もちろん、かなり頻繁にその天井に集中する必要があります。
Christian Louboutin is as famed brands,resolve be popular.Offers,such as Christian Louboutin Women’s shoes. The followers has been selling shoes at discount price merry mass. Shipping is within reach accessible of charge See details. The in the flesh constraint Salutation to Louboutin.
[url=http://christianlouboutinpumpsjp.com/]クリスチャンルブタン[/url]
[url=http://christianlouboutinpumpsjp.com/]ルブタン靴[/url]
[url=http://christianlouboutinpumpsjp.comクリスチャンルブタンパンプス[/url]
Thank you very much…just replaced my digitizer, and its working amazinglyyyy…
your help saved me 5000 buck dude…
i changed my x10 cover myself…
greatful to you.
thanQ
nice one found this great just changed my x 10 screen could not of done it without your help cheers 10/10
Excellent! Thanks for your help you saved the day. I had jammed a sim card adapter in the slot and successfully removed it.
i was wondering,if how much is the casing of sony ericsson xperia x10 and where we can buy those
i was wondering,if how much is the cover of sony ericsson xperia x10 and where we can buy those
Hey, thanks so much for that guide, my USB-connector broke off the platin, I gave it to an electrician, reassembled it and now it’s workin’ and loadin’ again 😀 Saved my day an’ a bunch of Euros
thanks man
Cheers mate! got it back working again!
What I needed to do was get to the earpiece/speaker as it has packed up. How do I get to this?
The Guys who are knocking this excellent guide are the ones who would pay ££££’s to repair their phones or simply throw them away at their loss.
I inadvertently broke two pins on the sim card reader. A local repair co wanted £25.00 to repair, this guide showed me how to remove the sim card reader & card reader pcb. These are selling for a £5.00 delivered on Ebay. (The same pcb holds the speaker in the black casing!)
Top Man and & grateful thanks.
I just broke my fon because folloowing this!
香里奈 ウェディングドレス
If you’re thinking about getting a dog, but aren’t sure you want to
make the commitment, try become a foster home for one.
Many homeless and abused animals are waiting in shelters for someone to adopt them and with over-crowding, resources
are slim. You can foster one to help out the
cause and find out if you want to keep one!